


Understanding the full range of orthopedic drill systems, saws, reamers, and drivers — and where each one shines in the OR — is essential for procurement specialists, OR managers, and manufacturers. Match the wrong tool to the procedure and the consequences show up fast: thermal bone damage, poor fixation, extended OR time, unhappy surgeons.
This article walks through the main types, their specific applications, and the selection logic that separates smart buying from guesswork. It is part of our comprehensive guide: Orthopedic Surgical Power Tools: Technology, Selection & Maintenance.
🔩 Orthopedic Drills: The Foundation Tool
The orthopedic drill shows up in virtually every orthopedic procedure. From the trauma bay to the arthroplasty suite to the spine OR, it’s the instrument surgeons reach for first. Here are the three domains where it earns its keep.
Trauma Surgery: The Orthopedic Drill at Work
Trauma ORs live and die by the orthopedic drill. Common uses:
- Drilling pilot holes for cortical and cancellous screws in plate fixation
- Over-drilling near the cortex for lag screw technique
- Drilling for cannulated screw placement over guide wires
- K-wire insertion for temporary fixation
Drill system requirements for trauma:
- Quick-release AO chuck for rapid attachment changes
- Variable speed control (0–1,500 RPM typical)
- Forward/reverse switching for screw insertion and removal
- Compact size for limited-access sites — wrist, ankle, small bone trauma
Arthroplasty: The Orthopedic Drill Meets Dense Cortical Bone
Arthroplasty brings different demands. The orthopedic drill shares the field with reamers, broaches, and saws, but it still owns specific tasks:
- Femoral stem canal preparation (broaching sequence)
- Tibial keel slot preparation in TKA
- Acetabular drilling in THA
Drill system requirements for arthroplasty:
- Higher torque for dense cortical bone
- Angled drill attachments for restricted anatomical access
- Flush cooling capability for thermal protection
Spine Surgery: Orthopedic Drill Precision Demands
In the spine OR, the margin for error shrinks to a few millimeters:
- Pedicle screw pilot hole creation
- Anterior cervical plate screw holes
- Facet preparation
Spine drill requirements:
- Precise torque limiting to prevent cortex breach
- Low-profile design for posterior access
- Tissue-protecting drill sleeves integrated into the handpiece
Heat is the constant enemy here too. A landmark study on bone drilling parameters{target=”_blank” rel=”noopener noreferrer”} confirmed what trauma and spine surgeons already knew: external irrigation is the single most important cooling factor, keeping bone temperature below the critical 47°C threshold across virtually all speed and diameter combinations. Skip the irrigation, and the orthopedic drill trades precision for thermal damage — a bad deal in any spine case.
🪚 Oscillating and Sagittal Saws: Bone Resection Tools
Oscillating Saw: The Arthroplasty Standard
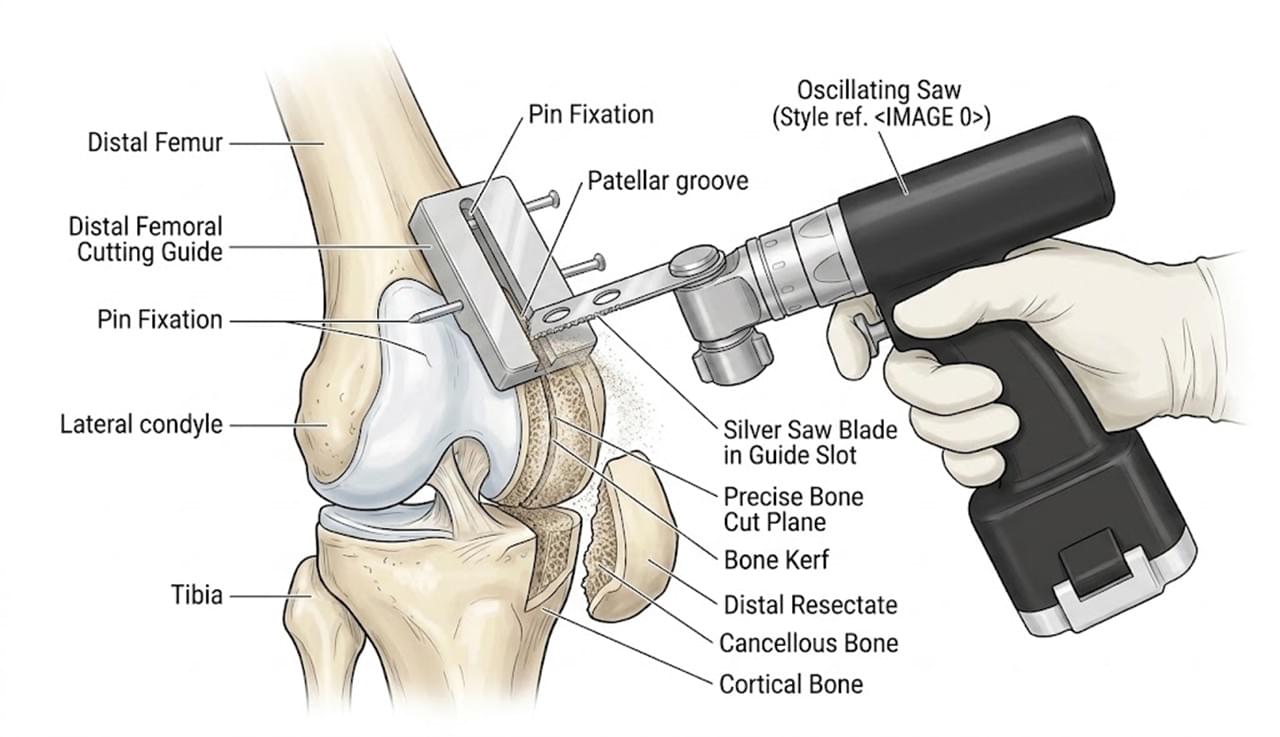
The oscillating saw is the workhorse bone-cutting tool for oscillating saw orthopedic surgery in total knee arthroplasty. The blade oscillates back-and-forth in an arc transverse to its axis (side-to-side), which gives you:
- Precise, controllable bone cuts
- Lower soft tissue injury at cut edges
- Better compatibility with cutting guides and jigs
TKA application — the five bone cuts:
- Distal femoral resection
- Anterior femoral resection
- Anterior and posterior chamfer resections
- Tibial plateau resection
- Patellar resection (optional)
Blade selection matters as much as the saw itself. Blade width, tooth geometry, and kerf (cut width) must match the cutting guide system and implant requirements. Most major implant manufacturers supply dedicated blade sets matched to their cutting guide geometry, and mixing brands is asking for trouble.
The StatPearls reference on TKA techniques{target=”_blank” rel=”noopener noreferrer”} is a solid read if you want the full procedure context — measured resection, gap balancing, and how each bone cut lines up with implant positioning.
Sagittal Saw: Versatile Cutter
The sagittal saw oscillates in the same plane as the handle (sagittal), giving you:
- Aggressive cutting in tight spaces
- Better reach into anatomically confined areas
Key applications:
- Fibular resection in pilon fracture surgery
- Cortical cuts in complex osteotomies
- Cement removal during revision arthroplasty
- Bone graft harvesting
🌀 Reamers: Canal and Socket Preparation
Surgical reamers handle the heavy lifting when it comes to canal and socket preparation.
Intramedullary Canal Reamers
Used to progressively enlarge the medullary canal before IM nail insertion:
Flexible reamers: required for femur (curved canal). Sequential tips (7mm → 8mm → 9mm, in 0.5mm increments) ream the canal while following its natural curvature. Driven at 150–250 RPM.
Solid reamers: for straight canals like the tibia. More aggressive cutting but perforation risk jumps in curved bones.
Key design features:
- Cutting flutes that clear bone debris proximally
- Cannulated center for guide wire passage
- Depth marking for controlled reaming depth
- Ball-tip design to prevent guide wire buckling at low speeds
Acetabular Reamers
Hemispherical reamers prepare the acetabular socket for cementless cup press-fit:
- Diameter range: 42mm–76mm (in 2mm increments)
- Cutting design: peripheral cutting or through-hole cutting
- Reamer-to-cup sizing: typically ream 1–2mm smaller than the implant for press-fit
- Driven at 200–400 RPM with constant irrigation
🪛 Wire Drivers and Screwdrivers
Wire Drivers
Essential for K-wire and Steinmann pin insertion:
- High-speed (500–1,500 RPM) with smooth variable control
- Smooth jaw chuck for secure wire grip
- Critical: self-drilling tip wires need higher torque than blunt wires
Torque-Limiting Screwdrivers
For bone screw insertion, torque limitation prevents the three classic failure modes:
- Over-tightening causing bone fracture at the insertion site
- Thread stripping in poor bone quality
- Screw head damage
Modern torque-limiting drills add electronic torque monitoring with programmable cutoff — the surgeon sets target torque based on bone quality and screw diameter, and the system confirms correct torque with LED and audio feedback.
📋 Procedure-Specific Tool Selection Guide
Matching the Orthopedic Drill to the Procedure
| Procedure | Primary Tools Required |
|---|---|
| Long bone fracture ORIF | Orthopedic drill, wire driver, cannulated driver |
| Total Knee Arthroplasty | Oscillating saw, acetabular reamer, orthopedic drill |
| Total Hip Arthroplasty | Orthopedic drill, acetabular reamer (hemispherical) |
| IM Nailing | Orthopedic drill, flexible reamer set, wire driver |
| Spinal fusion | Orthopedic drill, high-speed burr attachment |
| Revision arthroplasty | Reciprocating saw, flexible reamer, orthopedic drill |
| Limb lengthening | Wire driver, orthopedic drill |
The orthopedic drill appears in seven of the seven most common orthopedic procedures. That’s not coincidence — it’s the most versatile tool on the tray. Build your system around it first, then add the specialty attachments the procedures demand.
❓ FAQ: Types of Orthopedic Power Tools
Q1: What’s the difference between an oscillating saw and a sagittal saw?
An oscillating saw blade moves side-to-side (transverse to the handle) for precise cuts with minimal soft tissue damage — ideal for arthroplasty cuts with guides. A sagittal saw moves in the same plane as the handle, giving aggressive cutting in tight spaces for general resection.
Q2: Can one drill handle all orthopedic power tool functions?
Modern modular systems (Stryker System 7, for example) let one motor unit accept multiple attachments: drill chuck, oscillating saw, sagittal saw, reamer, wire driver. That cuts capital investment and simplifies sterilization logistics.
Q3: What RPM is correct for canal reaming?
150–250 RPM for flexible femoral reaming. 200–400 RPM for acetabular reaming. Push past those numbers and you buy yourself thermal injury risk and accelerated reamer wear.
Q4: How are orthopedic saw blades sized?
Blade width (5–70mm+), length (50–90mm), tooth pitch (fine, medium, or coarse), and oscillation angle compatibility must all match the cutting guide and procedure requirements. Most manufacturers supply procedure-specific blade kits.
Q5: What’s the difference between a wire driver and a standard drill?
Wire drivers are optimized for high-speed, low-torque K-wire insertion with smooth jaw chucks. Standard drills provide higher torque for bone drilling with AO quick-release chucks. They aren’t interchangeable for their primary applications.
🏁 Conclusion
From the orthopedic drill to the oscillating saw and the intramedullary reamer, every power tool type serves a defined clinical role. Matching the right tool to each procedure is what drives surgical efficiency, protects bone quality, and gives you implant fixation you can trust long after the patient leaves the OR.
Return to: Orthopedic Surgical Power Tools: Technology, Selection & Maintenance.
Looking for comprehensive orthopedic power tool systems or OEM supply? Contact our team for specifications and pricing.
⚠️ Medical Disclaimer
Informational purposes only. Device selection for specific procedures must follow manufacturer IFU and surgeon training protocols.

 English
 Arabic
 French
 German
 Italian
 Japanese
 Korean
 Portuguese
 Turkish
 Russian
 Spanish