


When a bone breaks, the clock starts ticking. Every surgeon knows the drill: get the fragments aligned, hold them still, and let biology do its work. External fixation handles this from outside the body — pins or wires anchor into bone, and an external frame locks everything together while the fracture stays fully accessible. Sounds simple on paper, but the mechanics behind it run surprisingly deep.
For anyone designing, manufacturing, or buying these systems, that depth matters. External fixation fracture treatment isn’t just about hardware — it’s about stiffness, micromotion, and understanding exactly what bone needs to heal. Get those fundamentals right, and everything else follows.
This article is part of our comprehensive guide: External Fixators: Design, Types and Clinical Applications.
🧬 The Biomechanical Basis of External Fixation
What Bone Healing Requires from External Fixation
Bone healing isn’t magic — it’s a biological process with three non-negotiable requirements:
- Fracture reduction: bone fragments lined up in the correct position
- Mechanical stability: enough rigidity to stop disruptive motion, but not so much that beneficial micromotion disappears
- Biological environment: intact blood supply, viable bone, and healthy soft tissue
Here’s the kicker: external fixation fracture treatment satisfies the stability requirement without wrecking the biological one. Unlike aggressive internal dissection, the frame works from the outside, leaving the fracture zone’s blood supply and soft tissue envelope untouched.
Why External Fixation Beats Immobilization
Decades of research — including the WHO’s guidance on fracture management — have settled one question definitively: absolute rigidity is not the goal.
- Too much motion → fibrous non-union, the healing process simply stalls
- Complete rigidity → primary bone healing, but without the robust callus you’d want
- Controlled axial micromotion under 1mm → strong callus, faster clinical union
Monolateral frames, in particular, are naturally elastic constructs. They permit that golden window of controlled micromotion while filtering out harmful bending and torsional forces. That balance is exactly what how external fixation works boils down to.
⚙️ Mechanical Stability: How the Frame Does Its Job
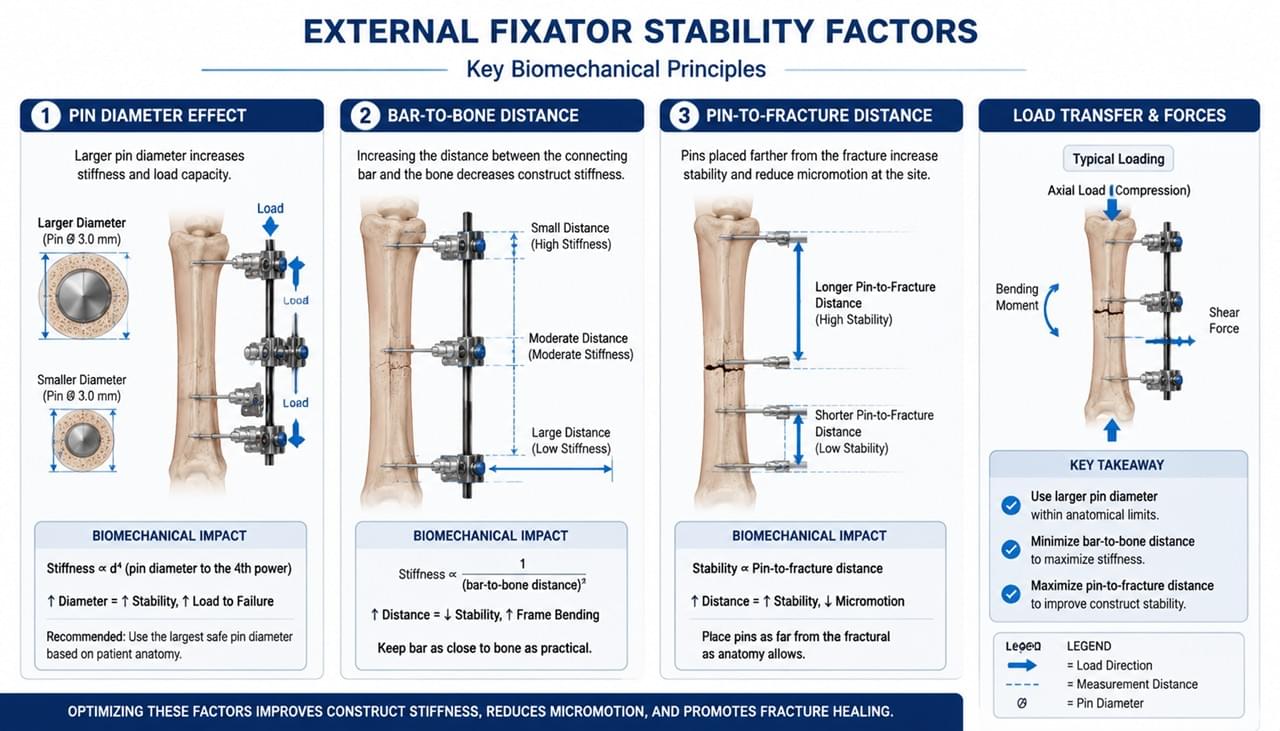
This is where things get technical — and where design engineers earn their keep.
The Pin-Bone Interface in External Fixation
Stability starts at the pin-bone interface, before the frame even enters the picture:
Schanz screw biomechanics:
- The threaded tip interlocks with bone, providing axial pull-out resistance
- The smooth shaft resists bending forces from the connecting rod
- Pin diameter is king: stiffness scales with (diameter)⁴
What separates good designs from great ones:
- Larger pins create much stiffer constructs — but they demand adequate bone cross-section
- Pin placement angle changes stiffness across different loading planes
- Bicortical purchase (pins crossing both cortices) dramatically improves pull-out resistance
Frame Stiffness: 5 Levers of External Fixation
Frame stiffness isn’t a single dial — it’s five levers working together:
- Pins per fragment: more pins, stiffer frame (diminishing returns beyond 3–4 per fragment)
- Pin-to-fracture distance: pins placed closer to the fracture create stiffer constructs
- Bar-to-bone distance: a connecting rod hugging the bone delivers more stability
- Connecting rod material: carbon fiber > aluminum > steel on stiffness-to-weight ratio
- Connecting bars: dual-bar configurations significantly improve rotational stability
The Stiffness-Dynamization Trade-off
Modern protocols are getting smarter about stiffness. External fixation fracture treatment increasingly embraces dynamization — deliberately softening the frame at specific healing stages:
- Early phase (0–6 weeks): higher stiffness protects the young callus as it forms
- Callus maturation (6–12 weeks): controlled axial dynamization (typically 5–10mm of telescoping) stimulates callus maturation and remodeling
- Late phase: frame removal once clinical and radiographic union are confirmed
🏥 The Surgical Workflow, Step by Step
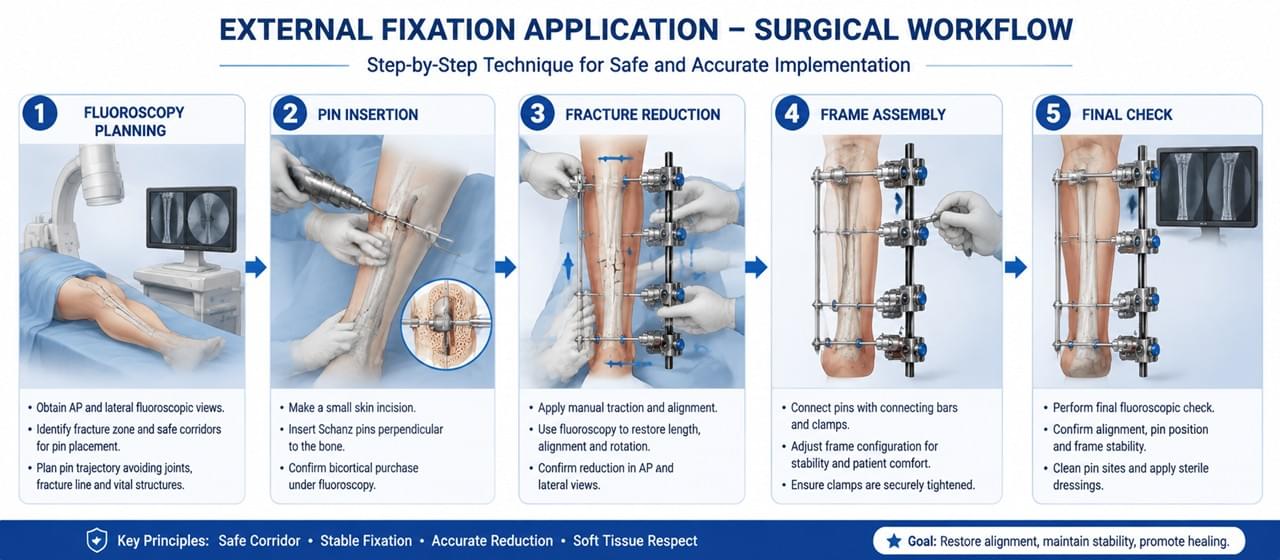
Understanding the workflow explains exactly what a system must deliver in the OR. Here’s the five-step journey, from planning to final check.
Step 1: Pre-Operative Planning 📋
X-ray review — CT for complex patterns — frame configuration selection, and pin sizing based on patient anatomy. Good planning prevents most problems before they start.
Step 2: Pin Insertion 🔩
Fluoroscopy-guided placement through tiny stab incisions. A drill sleeve protects soft tissue from insertion torque, and bicortical purchase is confirmed on imaging before moving on.
Step 3: Fracture Reduction 🔧
Traction restores limb length and alignment; rotation is verified clinically and with fluoroscopy. Manual reduction holds position while the frame is assembled around it.
Step 4: Frame Assembly and Locking 🔒
Connecting rods positioned, clamps secured to every pin, and all connections tightened to specified torque. Reduction and frame stability get one final fluoroscopy confirmation.
Step 5: Post-Application Assessment ✅
Neurovascular status checked, compartment pressure assessed in high-risk fractures, and wound dressings applied around each pin site.
🦴 The Biology of Bone Healing Under External Fixation
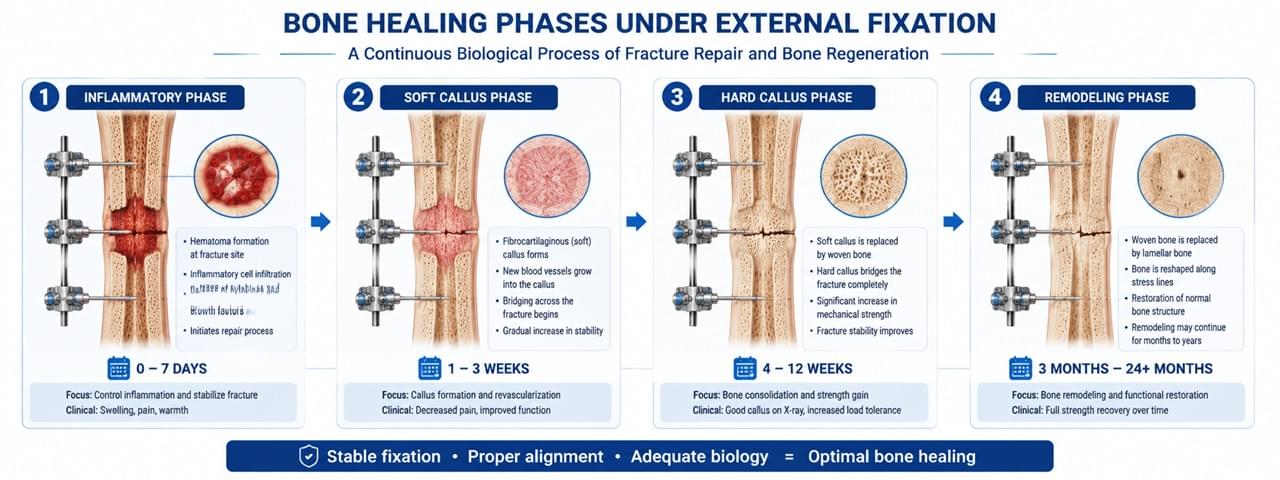
External fixation doesn’t just hold bone still — it sets up ideal conditions for secondary bone healing. Here’s the timeline, phase by phase:
Phase 1: Inflammation (Days 1–7) 🔥
The fracture hematoma forms a fibrin scaffold. Inflammatory cells clear debris and kick off the healing cascade.
Phase 2: Soft Callus (Weeks 1–4) 🧫
Mesenchymal stem cells differentiate into cartilage-forming cells, and a soft cartilaginous bridge spans the fracture gap.
Phase 3: Hard Callus (Weeks 4–12) 🦴
Cartilage mineralizes into woven bone. The frame’s controlled micromotion directly stimulates callus volume and strength.
Phase 4: Remodeling (Months to Years) 🌀
Woven bone is sculpted into lamellar bone along stress lines, and the callus gradually normalizes.
The external fixator bone healing connection is direct: the frame supports phases 1–3, then comes off once the hard callus can carry the load on its own.
✅ Where External Fixation Beats Internal Fixation
| Clinical Scenario | Why External Fixation Wins |
|---|---|
| Open fractures | No metal sitting inside a contaminated wound |
| Polytrauma (DCO) | Fastest stabilization method available; fully reversible |
| Severe soft tissue injury | Zero devascularization of the fracture zone |
| Infected non-union | Fixation without implants in an infected field |
| Limb lengthening | Enables gradual bone transport |
| Definitive tibial shaft fractures | Load-sharing promotes callus formation |
❓ FAQ: External Fixation Fracture Treatment
Q1: How long does external fixation stay on for a tibial fracture?
Typically 12–20 weeks for a closed tibial shaft fracture treated definitively. Removal waits until clinical and radiographic union criteria are met — no shortcuts.
Q2: Can external fixation handle hip fractures?
Rarely as definitive treatment in adults. Pelvic external fixators do appear in unstable pelvic fractures for damage control, but hip fractures themselves are usually managed with internal fixation or arthroplasty.
Q3: What exactly is “dynamization”?
It’s the deliberate loosening or replacement of connecting elements to permit controlled axial movement while rotational and bending stability hold. The goal: stimulate callus maturation in the late healing phase.
Q4: Does external fixation hurt more than a cast?
The pins can cause discomfort, especially during wound care — most patients adapt well. Modern low-profile pins and careful skin management keep pin site discomfort in check.
Q5: When should you convert from external to internal fixation?
When the fracture suits definitive internal fixation, soft tissues allow it, and contamination risk is low — typically within the first two weeks for high-energy fractures. Delayed conversion raises infection risk.
🏁 Conclusion
External fixation fracture treatment remains one of the most valuable techniques in the trauma surgeon’s arsenal — controlled, adjustable, biologically kind, and ready when internal fixation simply can’t go in. For manufacturers and distributors, the takeaway is commercial as much as clinical: the teams that understand the biomechanics behind these devices build better products and position them smarter.
Return to the main guide: External Fixators: Design, Types and Clinical Applications.
Interested in manufacturing or distributing external fixation systems? Contact our team for capability discussions.
⚠️ Medical Disclaimer
This article is for informational purposes only. Fracture treatment decisions require evaluation by qualified orthopedic surgeons. This content does not constitute clinical or surgical advice.
 English
 Arabic
 French
 German
 Italian
 Japanese
 Korean
 Portuguese
 Turkish
 Russian
 Spanish